Tools Introduction Class
Tools Feature & Advantage Introduction Class
Tools Operation and Application Class
Tools Maintanence and Repair Class
Tools Quality Checking and Certified Class
Tools Torque Introduction
Marketing Service Area
Member post
How to Plan Copper Tube Processing: Dimensions, Order, and Final Checks Explained
Popularity : 4You′ve got your tube cutter, bender, and flaring tool ready — does that mean you can start processing right away? Before you pick up any tool, there′s one more important thing to do:
Picture clearly what this copper tube needs to look like when it′s finished.
Once a copper tube has been cut, bent, or flared, there′s much less room to adjust or reposition it afterward. So this article isn′t about how to use any single tool — it′s about the bigger picture: what to check before you start processing a run of tube.
1|Look at the Finished Tube Run First, Not the Tool
When you pick up a length of copper tube, it′s easy to jump straight to "cut here, bend there, flare the end last." But before deciding which tool to pick up, it′s more important to confirm how the tube run should actually be laid out once finished. Start with a few questions:
- Where does the tube run need to start and end?
- Where does it need to change direction?
- Which points need to connect to fittings or other parts?
- Once finished, does the tube′s position match what the installation actually needs?
Get the finished layout clear first — then work backward to plan how to process each step in between.
2|Checking Dimensions Means More Than Measuring "Total Length"
Dimension checks before processing aren′t just about measuring how long a tube is — they also cover bend locations, connection points, and the distance between each section.
That′s because the processing itself affects the final dimensions. When bending, the bend follows a curve rather than a sharp right angle, so the actual tube length needed is affected by the bend radius and angle; when flaring a tube end, you also need to leave enough length at the end. If you only look at the total length, even if the cut length looks fine, any deviation in the bend location can still leave the tube end somewhere different from what you planned.
So before processing, mark out a few key positions in advance:
- Start end and finish end: the final positions both ends of the tube run need to reach.
- Bend start and bend end: where the bend is meant to begin and where it ends.
- Straight-section length: how much straight tube is needed before and after the bend so the end lands in the right position.
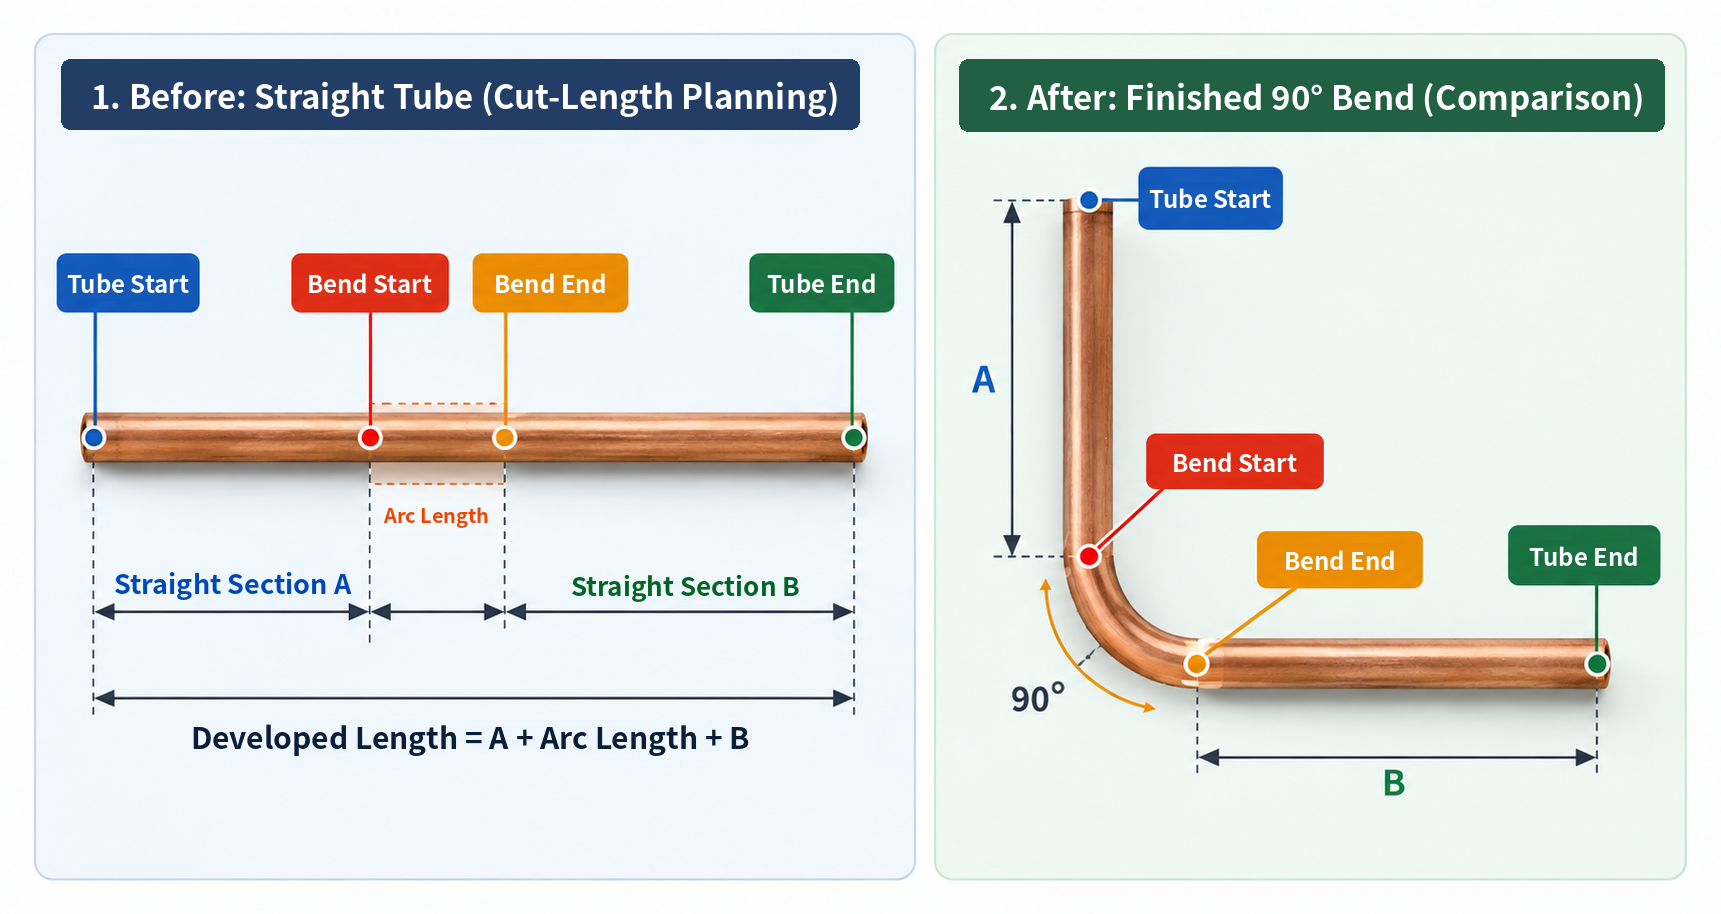
Don′t just measure "how long is this tube" — confirm "where every key point needs to be once processing is done."
3|Planning the Processing Order: Always Think One Step Ahead
Copper tube processing doesn′t always have to follow the exact same order every time. What really matters is: will finishing this step affect the next one?
A common example is forgetting to slide the flare nut onto the tube before flaring. Once the flare is formed, the nut can no longer be slid on from the tube end — the end has to be reworked from scratch.
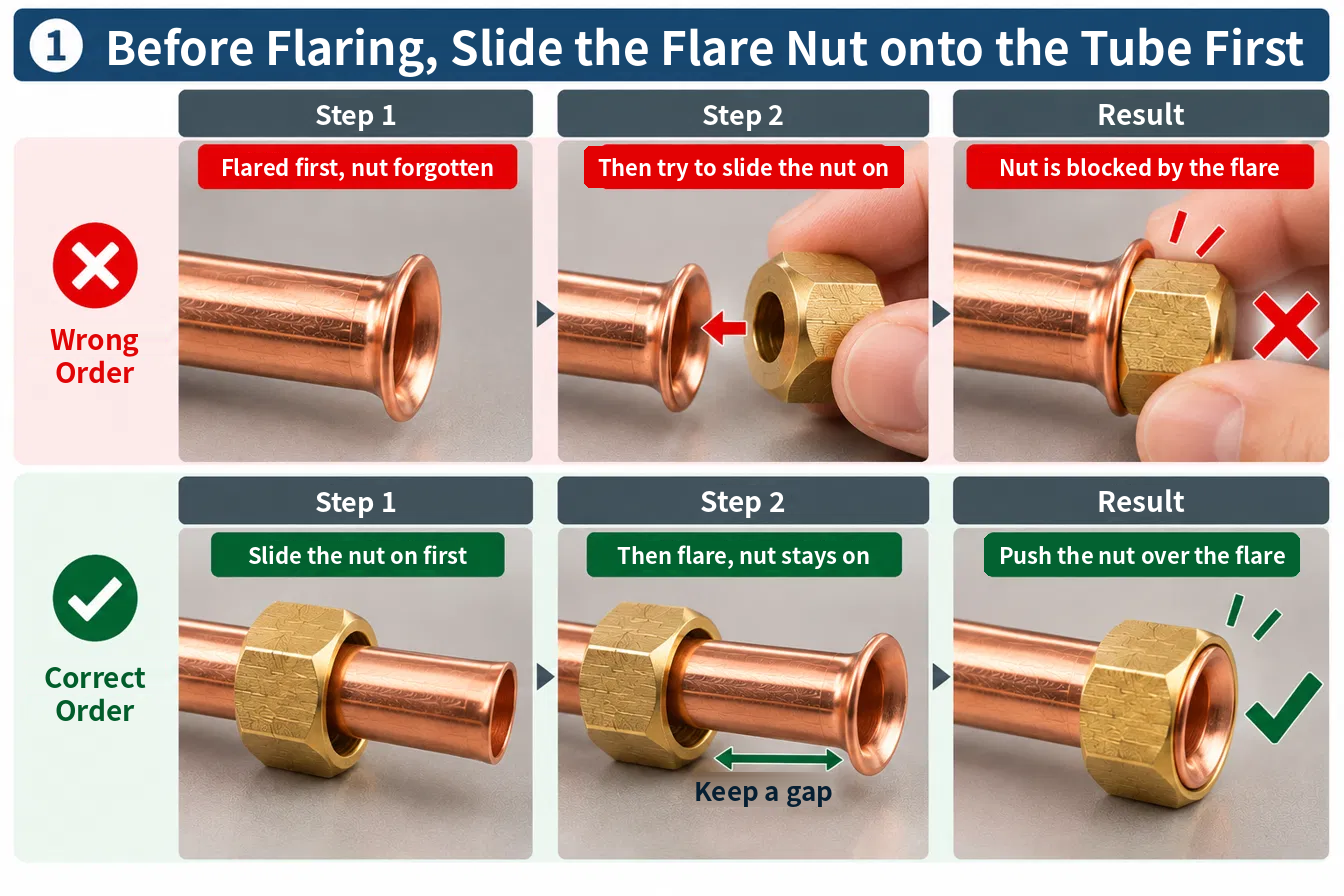
So before each processing step, check two things:
① Will the next tool still fit and be able to grip the tube?
The shape or position after processing can change the working conditions you had before. Once a step is done, check whether the next tool will still have enough room to operate.
② Are there any parts or steps that need to be prepared beforehand?
Some parts or treatments have to be completed before a certain processing step — if you only notice this after finishing, you often end up having to redo the work.
Once you′ve confirmed both, go ahead, and keep this rhythm in mind:
Process → Check dimensions and position → Confirm next-step working conditions → Continue processing
For example, after finishing a bend, first check whether the direction and position match what you planned, then look at the remaining tube length, the end position, and the working conditions for the next tool. The point isn′t to add extra steps — it′s to stop small deviations from piling up by the end.
Always think one step ahead; after finishing each step, confirm whether the next one can still be done.
4|The Final Check Is on the Whole Tube Run, Not a Single Step
Once everything is processed, don′t just confirm that "it′s cut, it′s bent, the end is done" — go back to the finished layout you set at the start and look at the whole tube run again.
Dimensions
Does the overall length and each section′s position match the original requirement?
Direction
Are the bends oriented correctly? Is everything positioned where it was meant to be?
Tube condition
Have the burrs been removed from the cut end? Is there any debris left inside the tube? Is there visible flattening, out-of-roundness, or other unwanted deformation at the tube end or bend?
Tube end
Is the connection point ready? Are any parts that needed to be slid on beforehand already in place?
Installation clearance
Once finished, will it interfere with nearby equipment, walls, or other parts?
What matters in the end isn′t "did you use every tool," but:
"Does this finished tube run actually achieve the result it was supposed to?"
Copper Tube Pre-Processing Quick-Check Table
Before you start processing, quickly confirm these 5 things:
① What should the final shape look like?
Confirm the finished position, direction, and connection requirements first.
② Are all the key positions confirmed?
Beyond total length, factor in the start end, finish end, and the bend start and end points.
③ Could the processing order affect itself?
Will the next tool still be able to operate? Are any parts that need to be slid on beforehand ready?
④ Do you re-check after each step?
Confirm dimensions, position, and the next step′s working conditions before continuing.
⑤ Does the final result meet the requirement overall?
Go back to the finished layout you set at the start and check the whole tube run again.
FAQ|Common Questions About Planning Copper Tube Processing
Q1|How do I figure out the cut length for bending?
Since the bend follows a curve, you can′t just add the two straight-section lengths together and call that the tube length you need. The actual length is affected by the bend radius, angle, and your working method. If you need tighter tolerances on the finished dimensions, leave some extra allowance based on your actual process, and confirm the final position and dimensions with a test bend or direct measurement.
Q2|What should I prepare before flaring?
After cutting, remove the burrs from inside and outside the tube end, confirm the end is flat with no debris left inside, then process the tube end. If the connection method requires a flare nut, remember to slide the nut on first before flaring — otherwise, once the flare is formed, the nut can no longer be slid on from the tube end.
Q3|What happens if the bend is too close to the tube end?
If there isn′t enough straight tube left at the end, the tool may not have enough room to grip securely during flaring or other end processing. So when deciding where to bend, consider not only the final direction of the tube run but also the working clearance needed for later processing.
Conclusion|Picture the Finished Result Before You Start Processing
Once you know what each of these tools — the cutter, the bender, and the flaring tool — actually does, the next step isn′t just using each one correctly. It′s confirming first:
What does this tube run need to look like when it′s finished?
Then work backward from that final layout to plan the dimensions, positions, processing order, and the working clearance each tool needs. After each step, re-confirm the dimensions and the next step′s working conditions before moving on. What you end up with isn′t just a series of steps that are each "done" — it′s a length of copper tube that genuinely meets the job′s requirements.
Good copper tube processing doesn′t start with picking up a tool — it starts with picturing clearly what you need to end up with.
Learn the tool. Enjoy the work.