Tools Introduction Class
Tools Feature & Advantage Introduction Class
Tools Operation and Application Class
Tools Maintanence and Repair Class
Tools Quality Checking and Certified Class
Tools Torque Introduction
Marketing Service Area
Member post
Why Does Copper Tube Flatten When You Bend It? Key Points for Using a Tube Bender
Popularity : 6You just want to bend a copper tube to the angle you need — so why does the bend flatten out, or even wrinkle, the moment you apply force?
Bending a tube looks simple, but as it changes direction, the outside of the bend gets stretched while the inside gets compressed. If the tube diameter, bend radius, or tool isn′t right for the job, the tube′s originally round cross-section can end up deformed.
This article starts from the common problems to help you understand:
- Why tubes deform so easily when bent
- What common bending defects look like
- What a tube bender actually does
- What to check before bending
- How to control angle and position during the actual bend
1|Why Does Copper Tube Deform So Easily When Bent?
When a copper tube starts to bend, it doesn′t deform evenly along its whole length.
At the bend itself:
Outer wall → gets stretched
Inner wall → gets compressed
In other words, as the tube changes direction, the inner and outer sides are actually under very different forces.
If the bending conditions aren′t right, the tube′s originally round cross-section can change along with it.
So being able to bend it to the right angle doesn′t automatically mean the bend itself is correct.
Besides the angle, you also need to check whether the tube kept a smooth, intact shape after bending.
2|What Are the Common Tube Bending Problems?
You can often tell whether a bend is normal just by its appearance.
① Flattened at the bend
What it looks like: The tube′s originally round cross-section is pressed flat, or even partially collapsed into an oval shape.
Why it happens: This is usually the result of bending the tube by hand with no bending tool at all, or using a bending groove that′s too large for the tube — leaving both sides of the tube without support, so it caves inward as soon as force is applied.
How to avoid it: Always use a tube bender sized for the tube′s diameter, so both sides of the tube are fully cradled by the groove.
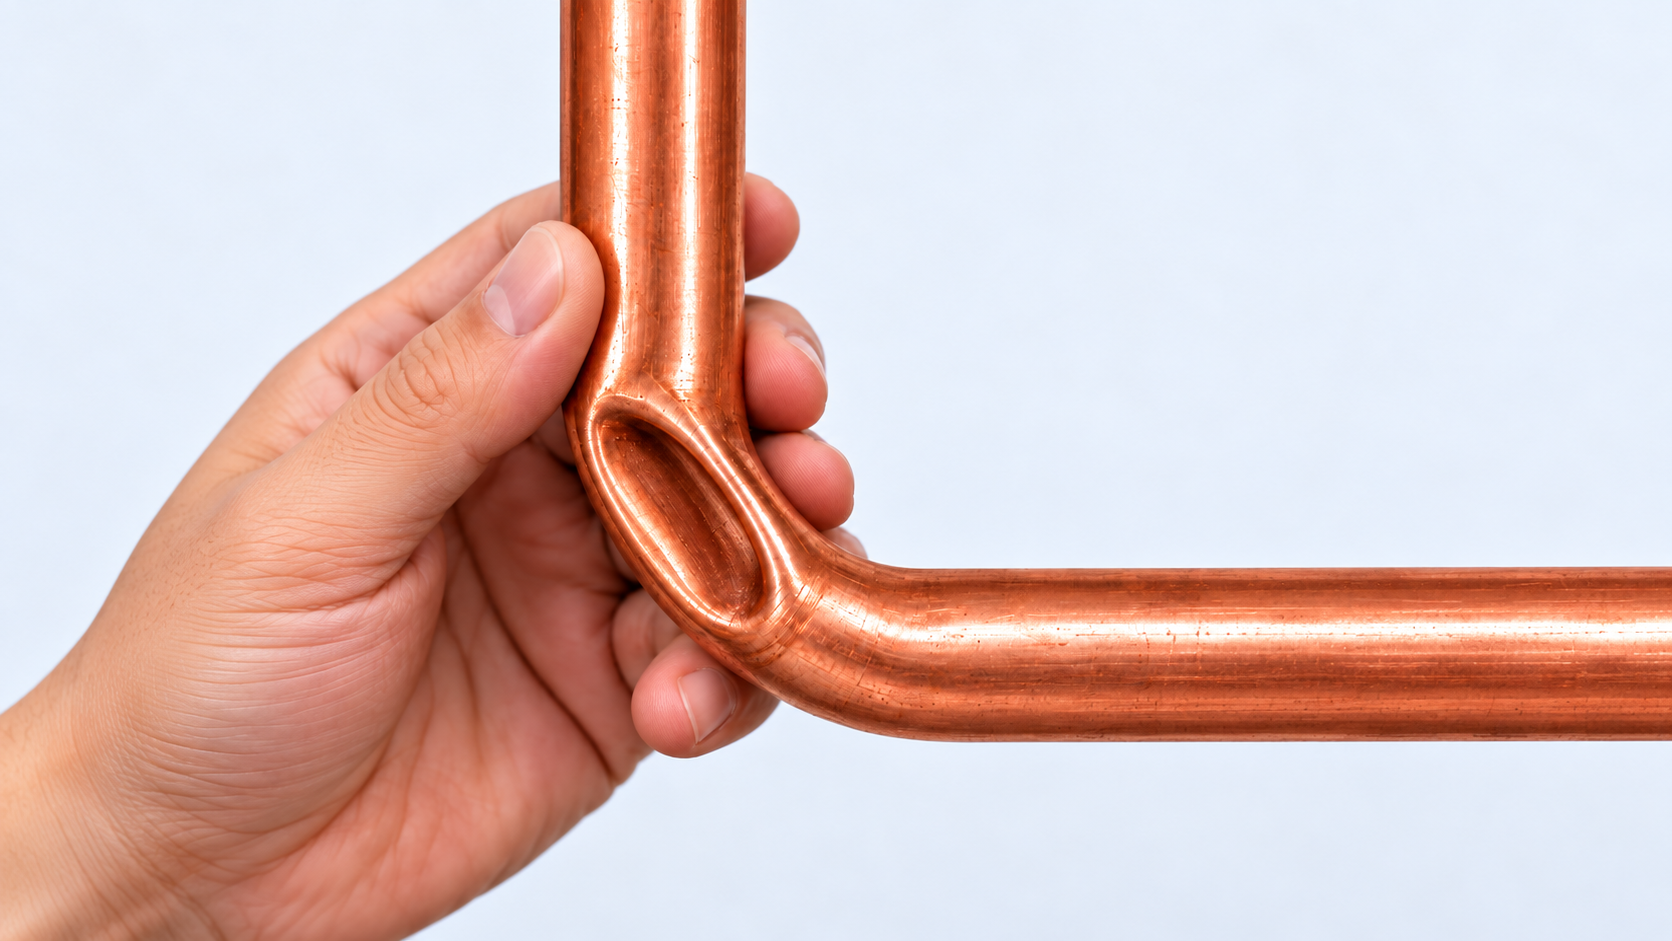
Flattened at the bend
② Wrinkling on the inner side
What it looks like: The copper on the inside of the bend bulges up into layered, accordion- or wave-like ridges — a severe case of visible wrinkling.
Why it happens: This usually occurs on softer tubing (such as annealed/soft copper tube). As the tube bends, the inner material is under heavy compression; if the bend is made too quickly, force is applied unevenly, or the tube lacks enough internal support, the compressed copper on the inside has nowhere to go and ends up bunching and piling up on itself.
How to avoid it: Bend slowly with steady, even force, and make sure the tool′s bend radius matches the spec for the tube.
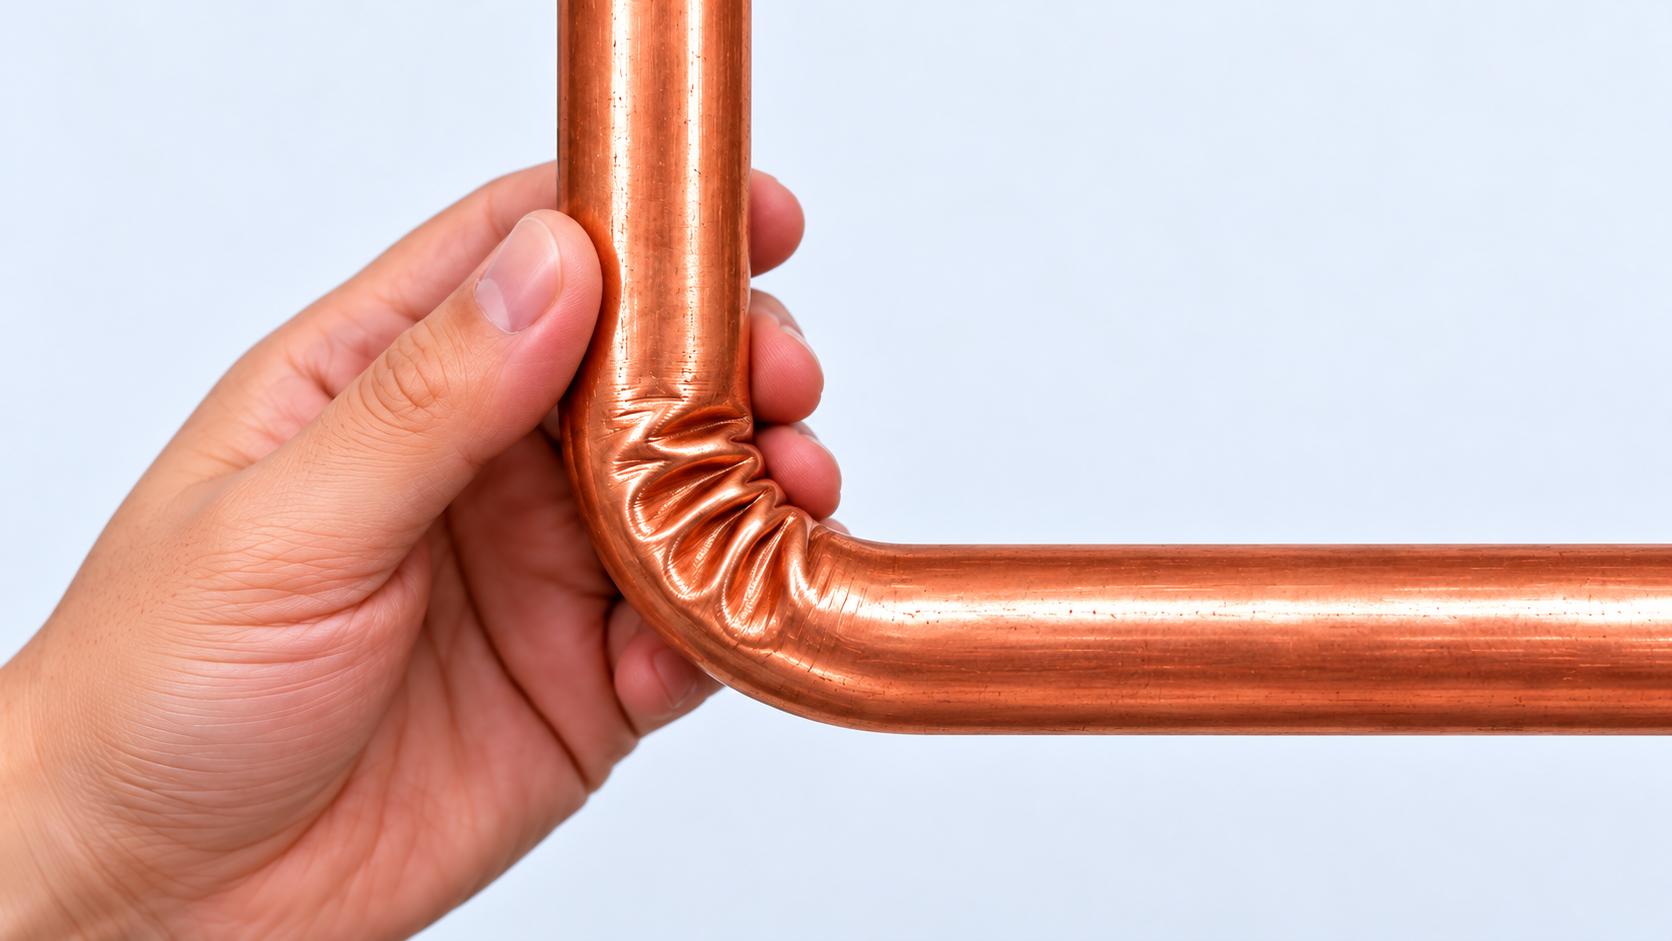
Wrinkling on the inner side
③ A kink or sharp dent
What it looks like: Instead of a smooth, continuous curve, the tube suddenly collapses at one specific point, forming a sharp, dead crease.
Why it happens: This is often caused by tubing that′s too hard (such as hard-temper copper tube that hasn′t been annealed), or a bend radius that′s too small — bent too sharply, at too tight an angle. When the tube can′t withstand the concentrated stretching and compressive stress at that one spot, the structure suddenly collapses right there.
How to avoid it: Check whether the tubing needs annealing based on its hardness, and avoid forcing a tighter bend than the tool is rated for.
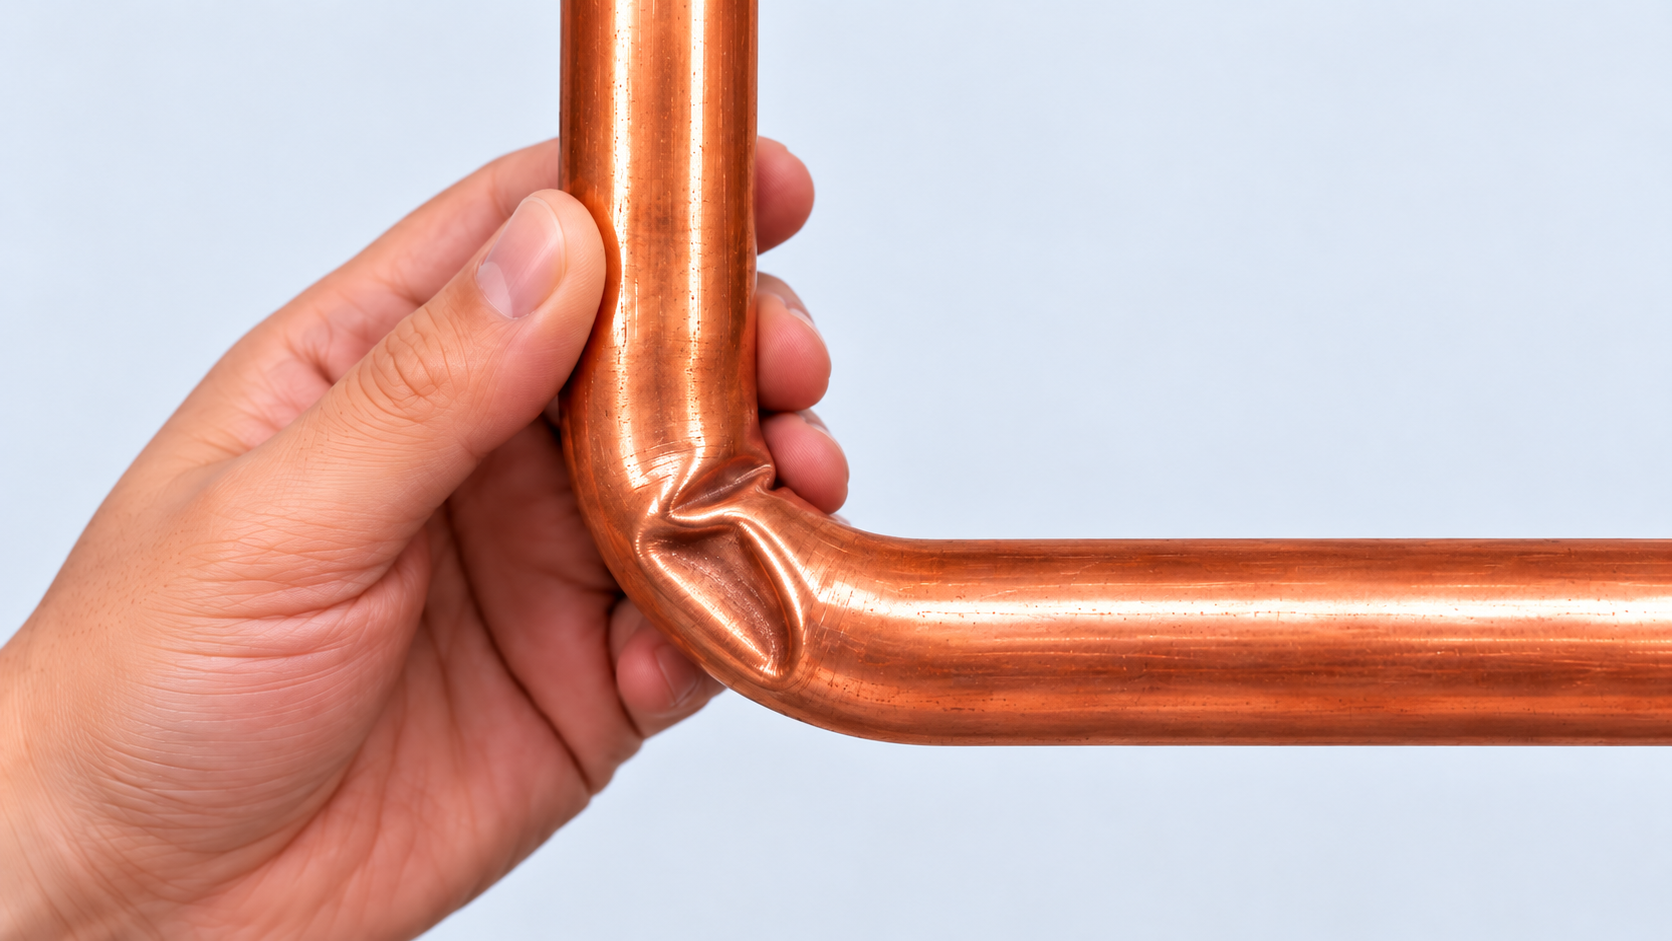
A kink or sharp dent
3|What Does a Tube Bender Actually Do?
A tube bender isn′t just there to "help you bend the tube."
What matters more is:
It lets the tube gradually form along a set bending path.
A tube bender uses a groove and bending structure matched to the tube diameter to support the tube, making the force applied more stable and lowering the chance of irregular deformation that comes from bending it directly by hand.
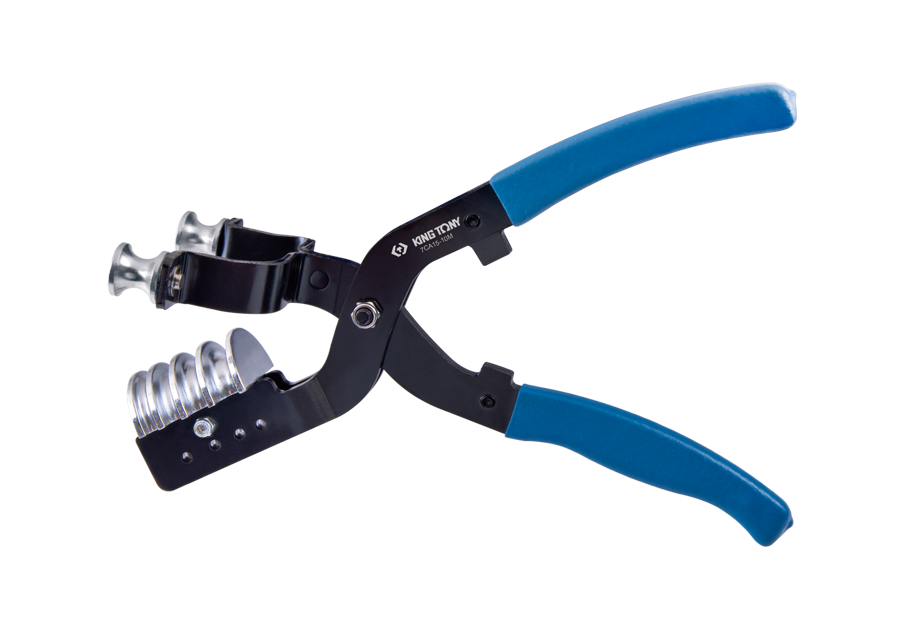
Take the KING TONY 7CA15-10M 90° Tube Bender as an example — with its 4-in-1 design, it covers:
- 3/16"
- 1/4"
- 5/16"
- 3/8"
OD copper, brass, and aluminum tubing, and can bend up to 90°.
Different tube sizes need to sit in their corresponding bending position.
Don′t use a groove that doesn′t match the tube diameter just because the tube "fits in."
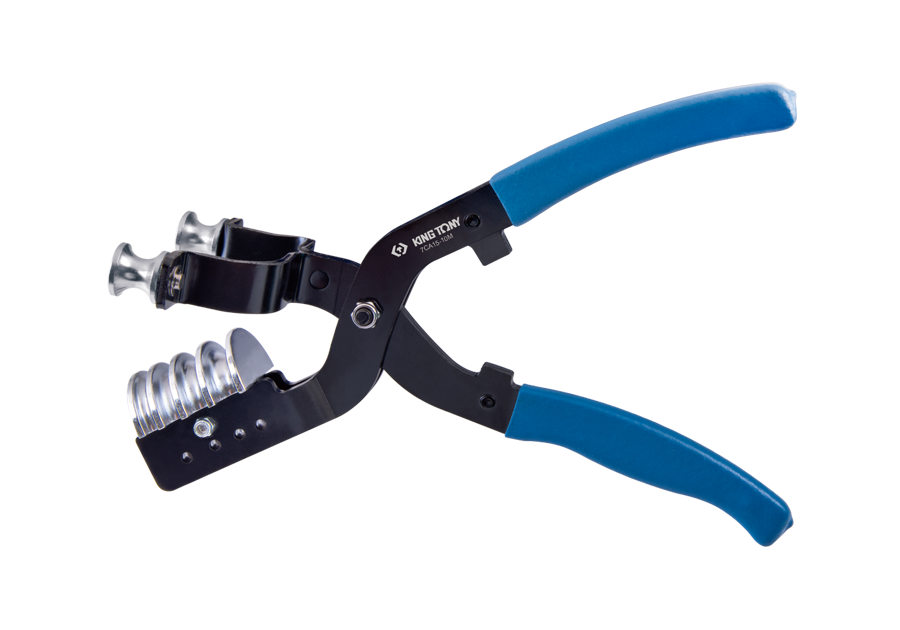
KING TONY 7CA15-10M 90° Tube Bender
4|Before Bending, Confirm the Tool and Tubing Actually Match
Before you start bending, the first thing to check isn′t how many degrees you need — it′s whether the tube bender you′re using is actually right for this tube.
Start by confirming two key points:
① Tube outer diameter
A tube bender usually marks the tube diameters it supports.
Different diameters need to use their corresponding bending position, so the tube gets proper support as it bends.
Don′t use a bending groove that doesn′t match the tube′s size just because the tube "fits in."
② Tubing material
Every tube bending tool has its own range of supported tubing materials.
Before use, confirm whether your copper, brass, aluminum, or other tubing matches the tool′s specifications.
5|How Do You Control Angle and Position During the Actual Bend?
Once you′ve confirmed the tool and tubing match, the next step is deciding where to start the bend and where it should end.
① Confirm the starting point of the bend
Before applying any force, confirm exactly where the tube needs to change direction.
If the starting point is wrong, even a correct final angle may leave the tube in the wrong position for the actual installation.
② Confirm the bending direction
Confirm which direction the tube run needs to extend in before bending, so you don′t end up with it pointing the wrong way once it′s done.
③ Bend gradually to the angle you need
Apply steady, consistent force as you bend, letting the tube gradually take shape along the bender′s curve.
Don′t overbend it first and then keep correcting it back.
Tube bending isn′t just about "how many degrees" — the starting point, direction, and angle of the bend all affect where the tube run ends up.
Conclusion|Being Able to Bend It Doesn′t Mean You Bent It Right
What really matters when bending a tube isn′t just whether you reached the angle you needed.
Whether the tool size matches, whether the bend is in the right position, and whether the tube keeps a normal shape once you′re done — all of that needs to be checked together.
Next time you bend a tube, keep this in mind:
Pick the right size → confirm the position → bend steadily → check the result
Keep these points in mind, and you′ll be able to change the tube′s direction while keeping it in good shape.
Learn the tool. Enjoy the work.
FAQ|Common Tube Bending Questions
Q1|Can I bend copper tube by hand?
Whether you can bend it by hand depends on the tube′s size, hardness, wall thickness, and bend radius.
But if you need to control a specific angle or position, or reduce the chance of abnormal deformation, using a tube bending tool sized for the tube gives you much more control over the result.
Q2|If the tube diameter is smaller, can I just use a larger bending groove?
Not recommended.
When the bender′s size doesn′t match the tubing, the tube may not get proper support, which increases the chance of deformation.
Q3|The tube didn′t break — so why isn′t the bend considered good?
Because bend quality isn′t just about whether the tube broke.
Besides the angle, you also need to confirm whether the curve and the tube′s overall shape are normal after bending.
Q4|Does a bigger bend angle mean more deformation risk?
Angle is only one factor.
Tube diameter, wall thickness, material, bend radius, and whether the tool matches the tube all affect the final result — so angle alone isn′t enough to judge it.