Tools Introduction Class
Tools Feature & Advantage Introduction Class
Tools Operation and Application Class
Tools Maintanence and Repair Class
Tools Quality Checking and Certified Class
Tools Torque Introduction
Marketing Service Area
Member post
KING TONY】Air Impact Wrench Low on Torque, Trigger Stuck, or Anvil Seized? 3 Common Causes and Fixes
Popularity : 24193An air impact wrench is one of the hardest-working tools in any auto shop — pulling wheels and running down nuts all day will eventually catch up with it. Three issues come up most often: it gradually loses power, the trigger sticks, or the anvil suddenly stops turning.
The good news is that most of these problems leave clues, and quite a few can be prevented. Match your symptom below and jump straight to that section:
| What you′re seeing | Go here first |
| It still spins and hammers, but the nut just won′t come loose | 2|Low Torque |
| The trigger won′t spring back, or the tool runs without the trigger pressed | 3|Trigger Stuck |
| You hear an odd noise while removing a nut, then the anvil stops turning | 4|Anvil Seized |
1|Get to Know the Wrench′s Three Systems First
Before you diagnose anything, it helps to know which part of the tool the problem could be coming from:
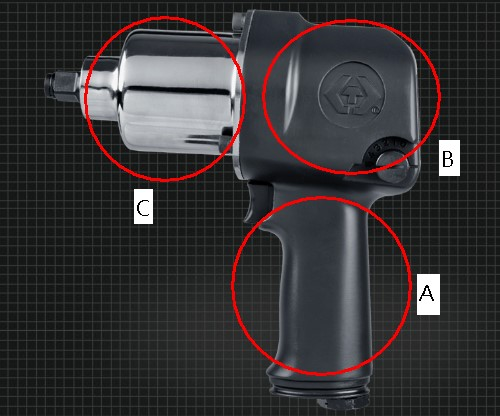
Figure: A Air Inlet System|B Drive System|C Impact System (approximate location of each system; the parts themselves sit inside the housing)
| Label | System | Main parts | What it does |
| A | Air inlet system | Trigger, inlet valve, O-rings | Controls how much air gets in and how it flows |
| B | Drive system | Cylinder, rotor, vanes | Converts air into rotating power |
| C | Impact system | Hammer case, hammer, anvil shaft | Converts rotation into impact torque |
For how each part is built and how to service it, see 〈KT Air Impact Wrench〉.
2|Low Torque: Check From the Outside In
Low torque doesn′t always mean the wrench itself is broken. Rule out external causes first before you consider opening it up.
Step 1: Confirm the air supply
An air impact wrench′s power comes from compressed air — if the pressure or volume reaching the tool is too low, the impact force drops along with it. Try a similar wrench that you know works, connected to the same air source. If it′s also weak, the problem is likely on the supply side; if it runs fine, go back and check the original tool. Two tools can draw different amounts of air, so treat this only as an initial check.
You can check the supply side and the tool′s own settings together:
- Regulator setting: is it below the pressure the tool recommends?
- Air hose: too small an inner diameter or too long a run will starve the tool of air
- Quick coupler: an undersized or clogged coupler will restrict flow
- Pressure adjustment dial and forward/reverse: is it set too low, and is the direction correct?
Step 2: Confirm whether it′s been oiled
Parts like the rotor and bearings spin at high speed inside the tool — without enough lubrication, friction increases, wear speeds up, and output power drops. Oil it and try again; sometimes the power simply comes back. See Section 5 for how.
Step 3: Check the internal parts
| Symptom | Check first | Notes |
| Air leaking, spins with no load | Air inlet system | A worn inlet valve or O-ring, or debris caught in them, can both cause air leaks |
| Weak impact force | Check the impact system first, then the gaskets and vanes | The impact system takes the load, so its parts are considered wear items; if it′s not the problem, check whether the gaskets or washers are damaged and leaking air, and whether the vanes are worn. Vanes rub against the cylinder as they spin, and once worn, output drops |
In the video′s example: a wrench used for two to three years without ever being oiled still had no power after oiling — it only recovered once the worn vanes were replaced.
[Video] How to Fix Low Torque on an Air Impact Wrench|Model shown: 33411-050
3|Trigger Stuck: Wear, Debris, or a Loose Part
If the trigger won′t spring back normally, or the tool runs on its own without the trigger being pressed, stop using it immediately and disconnect the air supply to prevent the tool from starting unexpectedly. There are three common causes:
- Trigger spring fatigue: the spring inside the trigger is pressed over and over every day, and fatigues over time.
- Debris stuck in the inlet valve: dust and oil residue from the shop floor gets into the air inlet, which can keep the inlet valve from moving properly or cause it to leak.
The fix is to open up the air inlet and inspect it, then clear out any debris or replace the trigger or inlet valve as needed. Getting in the habit of oiling before and after use afterward helps reduce the chance of it sticking again.
[Video] How to Fix a Stuck Trigger on an Air Impact Wrench|Model shown: 33411-050
4|Anvil Seized: Be Careful Forcing Off a Rusted Nut
If you hear an odd noise inside while removing a nut and the anvil then stops turning, it′s usually a problem in the impact system — a common cause is a cracked hammer. When a nut is rusted or over-tightened, the impact force can′t convert into turning the nut, so it just keeps slamming into the hammer itself, which wears it out over time.
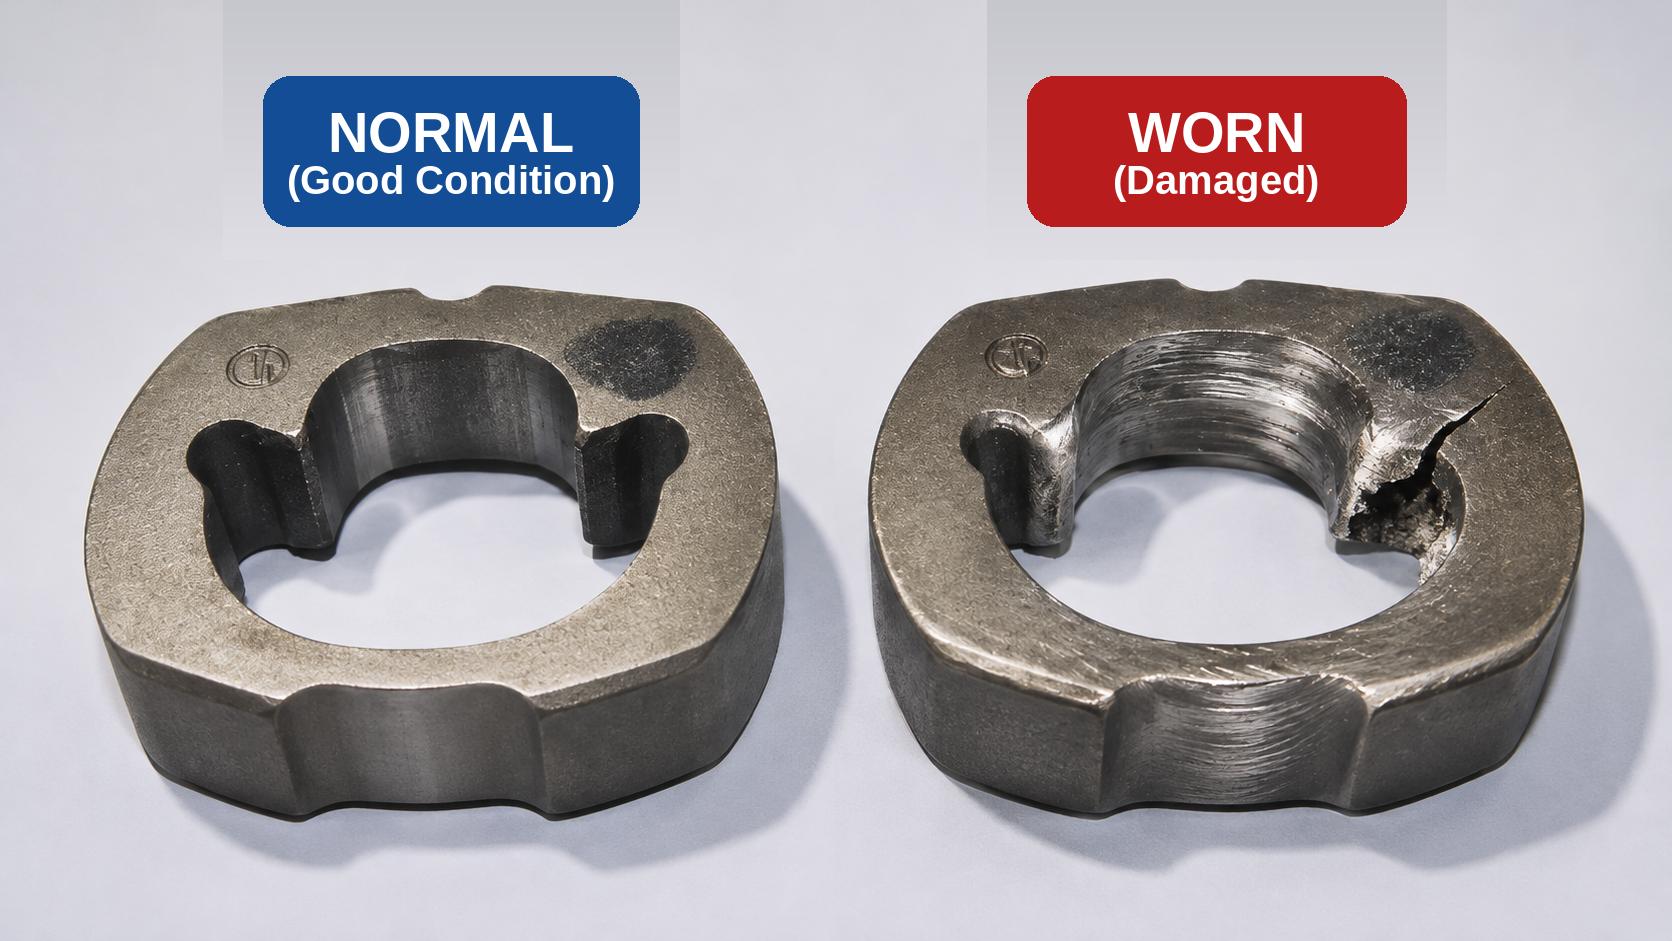
Figure: The hammer
The fix: open the front housing, inspect the impact system, and replace parts as needed based on the damage. The video shows a case where the hammer had actually cracked.
How to prevent it: for a rusted nut, spray on a rust penetrant first and let it soak in per the product′s instructions before removing the nut. A normal bolt should usually come loose in about 2 to 3 seconds; if it still hasn′t budged after 5 seconds, switch to a higher-torque air tool instead of continuing to force the wrench against it.
[Video] How to Fix a Seized Anvil on an Air Impact Wrench|Model shown: 33411-050
5|Daily Maintenance: Oiling Matters Most
Causes of failure vary, but quite a few can be prevented with regular maintenance — and oiling is the most important part of that.
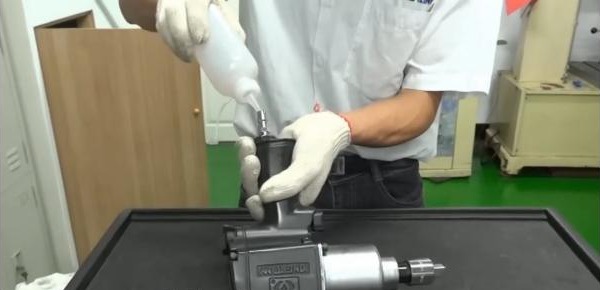
Figure: Oiling through the air inlet
- Oiling: before and after use each day, add 2 to 3 cc of pneumatic tool oil through the air inlet, connect the air supply, and run the tool for a few seconds to work out the excess oil. For long jobs, top it up a few more times along the way. Don′t attach a socket while running it unloaded, and keep your hand away from the anvil.
- Don′t force it: for a nut that won′t budge, deal with the nut itself first, and switch to a higher-torque tool if needed.
For greasing the hammer case and how to set up your air supply system, see the maintenance section of 〈KT Air Impact Wrench〉.
6|Fix It Yourself or Send It In?
Checking the air supply and oiling are things you can handle yourself. Replacing parts like the trigger or hammer requires opening up the tool body — if you don′t have experience, it′s best to leave that to a dealer. The clearance between the cylinder and the inner wall is extremely tight and needs special tools, so the manufacturer doesn′t recommend disassembling it yourself; sending it back to the factory for repair is the better option. Whether you′re inspecting or doing repair work, always disconnect the air supply first.
For how to service each part, see the repair notes in 〈KT Air Impact Wrench〉.
FAQ|Common Questions About Air Impact Wrench Troubleshooting
Q: Does low torque always mean the wrench is broken?
Not necessarily. Confirm the air supply, the pressure adjustment dial, and oiling first — only once all of those are ruled out should you consider replacing internal parts.
Q: Can I use an air impact wrench to remove a rusted nut directly?
It′s not recommended to force it right away. Spray on a rust penetrant and let it soak in first; if the nut still won′t come loose after 5 seconds, switch to a higher-torque tool.
Q: How often should I oil it?
Once before and once after use each day, 2 to 3 cc each time, with a few extra top-ups during long jobs.
Q: Can I use a regular hand socket with it?
It′s not recommended. Hand sockets aren′t designed for high-frequency impact and can crack. For the difference, see 〈What′s the Difference Between a Hand Socket and an Impact Socket?〉.
Conclusion
Low torque, a stuck trigger, and a seized anvil each have different causes — it could be the air supply, worn parts, or how the tool is being used. Diagnosing the symptom first and checking from the outside in keeps you from assuming the tool is broken too quickly; oiling it regularly and not forcing a rusted nut lowers the odds of a failure in the first place. If you can′t narrow it down, hand it off to a dealer or the factory for help.
Learn the tool. Enjoy the work.
